How to Choose the Best Surgical Kits for Dental Implants?
A surgical kit sits at the center of every implant procedure you perform. It shapes your workflow, your chair time, and how consistently each case turns out. Yet many practices pick a kit based on price or habit, then find out months later that it does not match the way they actually work.
At Universal Shapers, we manufacture implant instruments every day, and we talk with clinicians about what makes a kit worth the investment. This guide shares what we have learned, so you can evaluate dental implant surgical kits with a clear checklist instead of guesswork.
Start With What a Complete Kit Should Include
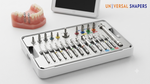
Not every kit covers the same ground. Some focus only on core osteotomy drills, while others bring together a full range of instruments for site preparation, contouring, and component seating.
A well-rounded kit typically includes:
-
Pilot and progressive osteotomy drills for establishing the implant site
-
Drills with a self-centring tip for better entry point control
-
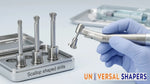
Instruments for contouring the crestal bone around the implant platform
-
Depth stops and extension drills for posterior access
-
Instruments that support abutment seating and prosthetic connection
Before you compare prices, compare contents. A lower-cost kit that leaves out key instruments often costs more once you buy the missing pieces separately.
Confirm Compatibility With Your Implant System
Compatibility is the first practical test any kit must pass. Every dental implant system has its own platform dimensions, connection types, and recommended drilling protocol. A kit that does not align with these details creates problems at the worst possible moment, in the middle of surgery.
Check these points before you commit:
-
Do the drill diameters match the implant sizes you place most often?
-
Do the depth markings correspond to your implant lengths?
-
Does the kit work with your guided surgery sleeves, if you use them?
-
Does the manufacturer provide clear documentation for your specific system?
If any answer is unclear, ask the manufacturer directly. A reliable supplier answers these questions without hesitation.
Compatibility also affects how easily you can expand your protocol later. If you plan to add guided surgery or start placing a second dental implant system, choose a kit whose drill diameters and tolerances adapt to those changes. Otherwise, you may end up maintaining two separate sets of instruments and training your team on both.
Look at How the Kit Supports Bone Drilling
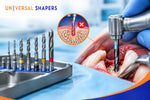
Drill design directly affects how predictably you can prepare the osteotomy. When you evaluate bone drilling for dental implants, look beyond the drill diameters on the spec sheet and ask how each instrument behaves in real bone.
Questions worth asking about the drills in any kit:
-
Do the drills hold a straight trajectory once they engage the cortical plate?
-
Does the cutting geometry help control heat during longer sequences?
-
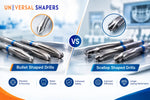
Does the kit offer specialized drills for dense cortical bone or sloped ridges?
-
Do the flutes clear bone debris efficiently, so you can maintain irrigation and visibility?
We design our drills with these questions in mind, since predictable cutting behavior reduces the number of corrections you need to make mid-procedure.
Consider the Instruments Around the Abutment
Many clinicians focus on osteotomy drills and overlook the instruments that support the restorative side of the procedure. Yet the bone profile around the implant platform affects how cleanly a dental abutment seats and how soft tissue heals around it.
This matters most in full-arch cases, where several implants must align under one prosthetic framework. A kit that includes instruments for bone profiling and abutment access gives you a more consistent bone platform at every implant site, which makes the restorative phase smoother.
When you review a kit, ask whether it covers:
-
Bone profiling or contouring drills for the crestal area
-
Access instruments for cover screws and healing components
-
Extension drills for multi-unit abutment sites
A kit that handles these steps keeps your surgical and restorative phases aligned.
In practice, this alignment saves time at the restorative appointment. When the crestal bone has a consistent contour, the dental abutment seats fully on the first attempt, and your restorative dentist spends less time adjusting around uneven bone. That small gain adds up across a busy schedule, and it improves the experience for your referring colleagues as well.
Judge Instrument Quality Before You Buy
Instrument quality shows up in two places: how the drill performs on day one, and how it performs after fifty sterilization cycles. A drill that dulls early or changes its cutting behavior forces you to replace instruments more often and introduces inconsistency into your technique.
What to look for in instrument quality:
-
Consistent cutting geometry across every drill in the set
-
Materials that withstand repeated autoclave cycles
-
Clear depth markings that stay legible over time
-
Smooth, uniform surface finish with no visible machining marks
Ask the manufacturer how they test their instruments, and whether they can share data on durability across sterilization cycles. Clear answers signal a supplier who stands behind the product.
Match the Kit to Your Case Mix
The best kit for a busy full-arch practice looks different from the best kit for a general dentist placing a few single-tooth implants each month. Review your own caseload before you decide.
|
Practice Profile |
What to Prioritize in a Kit |
|
Occasional single-tooth placements |
Core osteotomy drills, clear sequencing, simple tray layout |
|
High-volume general implant practice |
Broad drill range, durable instruments, efficient workflow |
|
Guided surgery focus |
Sleeve-compatible drills, tight tolerances, stop components |
|
Full-arch and multi-unit cases |
Extension drills, contouring instruments, abutment access tools |
Buying a kit that matches your real case mix means you use every instrument regularly, rather than letting expensive pieces sit unused in the tray.
Weigh Cost Against Long-Term Value
Price matters, but the sticker price rarely tells the full story. A kit that costs less upfront can cost more over time if its drills wear quickly, if you need to buy missing instruments separately, or if inconsistent performance leads to extra chair time.
Instead of comparing only the purchase price, consider the cost per case over the life of the kit. A durable set of dental implant surgical kits that performs consistently across hundreds of procedures often delivers better value than a cheaper option you replace within a year or two.
Ask yourself a few practical questions:
-
How many cases can I realistically complete before the drills need replacing?
-
Does the manufacturer offer replacement drills individually, so I do not need to rebuy the whole kit?
-
Will the kit grow with my practice if I start placing more complex cases?
A kit that scales with your practice protects your investment as your caseload changes.
Think About Workflow, Sterilization, and Support
A good kit fits into your daily routine without adding friction. Consider how the tray is organized, how easy it is to identify each instrument during surgery, and how well it handles your sterilization process.
Manufacturer support matters just as much. When you have a question about sequencing or a problem with an instrument, you want a team that responds quickly and knows the product. We provide technique guidance and documentation with our kits, because we know a well-designed instrument still needs clear instructions to perform at its best.
Common Mistakes to Avoid
We see the same mistakes repeat when practices select a kit.
-
Choosing based on price alone, without comparing what each kit includes
-
Skipping the compatibility check with the existing implant system
-
Buying a large kit with many instruments the practice rarely uses
-
Ignoring manufacturer support and documentation until a problem appears
-
Overlooking the instruments needed for the restorative phase
Avoiding these mistakes saves you both money and frustration over the life of the kit.
Conclusion
The best kit is the one that fits your implant system, supports your caseload, and delivers consistent performance over years of use. Compare contents, confirm compatibility, test instrument quality, and weigh the support a manufacturer offers before you decide.
At Universal Shapers, we build our instruments to meet this standard, from the first pilot drill to the final contouring step, so you can focus on the clinical work in front of you. Reliable bone drilling for dental implants starts with instruments you can trust case after case. Explore our full range of dental kits at Universal Shapers to find a system that matches the way you practice.