Essential Protocols for Multi-Unit Abutment Profiling
A successful full-arch restoration depends on many small details. One of the most important is how the multi-unit abutment seats on the implant. The connection must be precise. The surrounding bone and soft tissue must welcome the abutment. This preparation is called abutment profiling. It shapes hard and soft tissue for a clean and stable interface. In this article we explain the essential steps. We focus on correct instruments, including bone profiling drills and bullet shaped drills, to achieve a passive fit and long-term tissue health. Universal Shapers designs tools that help you get every step right.
Why Accurate Abutment Profiling Is Critical
This stage sets the foundation for both mechanical stability and biological integration. Without it, even the best prosthesis can fail early.
Foundation for Prosthetic Longevity
A multi-unit abutment anchors the final prosthesis. If it does not seat completely, micro-movement occurs. That movement stresses the screw and implant connection. It can cause screw loosening or component fracture. Proper profiling removes bony interferences around the implant platform. It creates a flat, even seat. The abutment then engages the hex with full contact. Full seating distributes forces evenly. It protects the restoration from mechanical complications. When you profile correctly, you build a stable foundation that helps the prosthesis last many years.
Direct Influence on Soft Tissue Health
Tissue health around a multi-unit abutment is not a matter of chance. The soft tissue needs a smooth emergence profile. Rough transitions or ledges trap bacteria. This can cause inflammation and peri-implant mucositis. Profiling shapes the bone so the gingiva forms a natural collar. A smooth, rounded bone contour supports the papilla and maintains biologic width. Healthy soft tissue makes the restoration look better and stay cleaner. Your profiling protocol directly shapes this critical zone, so precision matters.
Core Pre-Profiling Steps
Verify Implant Platform and Hex Alignment
Before touching any drill, confirm the implant position. Remove the healing cap and clean the internal connection. Inspect the platform under good light. Check the hex for damage or debris. Use a radiograph if bone may have overgrown the implant shoulder. The multi-unit abutment will seat correctly only if the platform is completely flat and exposed. Any overlapping bone must be removed gently with a bone profiling drill. Dry the field and note the hex orientation. Mark it on a guide or remember it. This small step saves time later.
Select the Correct Abutment Blank and Screw
Match the abutment to the implant system, platform diameter, collar height, and angulation. Before profiling, choose the correct abutment blank and screw. Use the screw designed for that specific abutment and implant. It should engage smoothly by hand. The abutment must sit passively on the platform before you torque it. Keep the abutment nearby as a visual reference during bone removal. Confirm that the emergence profile matches the mucosal thickness. This places the final crown margin in the right spot.
Digital Positioning and Scan Protocol
Digital tools add accuracy. Scan the implant position with a scan body before removing any bone. This baseline scan shows the exact implant position and angulation. You can plan the ideal abutment profile on the digital model. Software allows you to measure how much bone to reduce around the platform. Some clinicians use a digital profiling guide that fits over the implant. After profiling, scan again to confirm the bone is flush with the platform. A pre- and post-scan comparison removes guesswork. It helps you achieve a truly passive fit.
Step-by-Step Abutment Profiling Workflow
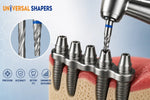
Start with the right speed and irrigation. Bone profiling drills must run at recommended RPM with plenty of sterile saline. High speed without cooling can overheat bone. Attach the appropriate bone profiling drill to the handpiece. Our bullet shaped drills create a smooth, rounded contour around the implant platform. The bullet shape follows natural anatomy and avoids sharp angles that could irritate soft tissue.
Approach the implant from directly above. Align the drill’s guide pin with the internal connection. Some bone profiling drills have a non-cutting centering pin. This ensures the cutting edges work concentrically around the platform. Lower the rotating drill until the flutes touch bone. Apply gentle pressure and let the drill do the work. Move in a small circular motion to reduce high spots evenly. The goal is a flat shoulder of bone exactly level with the implant rim.
Work patiently. Check progress often. Stop irrigation and dry the area. Use a probe to confirm the bone is flush all around. Check the hex again. The internal connection must be free of bone chips. Flush out debris with a syringe. The abutment should now sit passively. Place it without the screw and confirm there is no visible gap. If you feel rocking, you still have interference. Identify the high spot and revisit it with the bullet shaped drill.
Tilted implants need a slight angle. Reduce more bone on the facial side to create a smooth emergence. Angle the drill to create a ramp that blends the bone level with the abutment path. Bullet shaped drills are helpful here. Their rounded tip smooths the bone without creating a step. Always irrigate and check the angle frequently with a try-in.
Passive Fit and Final Verification
Once profiling is complete, dry the bone. Place the multi-unit abutment and tighten the screw by hand until it stops. Use a torque wrench to reach the manufacturer’s recommended value. Listen for a solid stop. Take a radiograph. Look for a uniform radiolucent line at the abutment-implant interface. Any dark wedge means incomplete seating. This may be trapped bone or soft tissue. If you see a gap, remove the abutment, clean the platform, and check again. Sometimes bone profiling drills leave a tiny ridge that only shows under torque. Smooth it out and re-seat.
Run floss under the abutment base to check for tissue blanching. The soft tissue must sit passively with no pressure. A passive fit means the restoration will not be under constant tension. This is the final quality check. Only after a perfect fit should you proceed to the impression or final scan.
Conclusion
Abutment profiling cannot be rushed. Platform inspection, tissue contour, and component selection all matter. Using the right instruments like bone profiling drills with a bullet shaped design gives you control. The steps outlined help you verify alignment, plan digitally, and perform a clean profiling workflow. The result is a multi-unit abutment that seats passively and supports healthy soft tissue. Visit Universal Shapers for tools that make this delicate work easier and more precise. When you follow these protocols, you protect your restoration and your patient’s health for years to come.