How to Choose the Right Implant Drill for Successful Dental Implants?
Every successful implant begins with a well-prepared site. Before the fixture is placed, before the abutment is seated, and long before the final crown is fitted, a drill is shaping the bone that will hold everything together. That step happens fast, but its effects last for years.
Many clinicians invest considerable time selecting the right implant system and prosthetic components, yet give relatively little thought to which drill is doing the actual cutting. The right implant drill influences how cleanly the osteotomy is formed, how much heat reaches the surrounding bone, and how firmly the implant seats at placement. All three factors have a direct bearing on long-term success.
What Makes a Drill the Right Choice
There is no single drill that fits every clinical situation. The best implant drill for a given case depends on bone density, implant design, surgical approach, and site anatomy. Understanding how these variables interact is what separates a thoughtful choice from a default one.
A drill that performs well in dense cortical bone may not behave the same way in softer cancellous tissue. Recognizing these distinctions is the first step toward building a more consistent surgical workflow.
Understanding the Main Drill Types
Knowing what each drill type is designed to do helps clinicians match instruments to clinical needs with more confidence.
Spiral and Twist Drills
These are the most widely used instruments in implant site preparation. They cut efficiently across a range of bone densities and allow debris to move away from the cutting zone through their flute design. For most straightforward cases, a well-made spiral drill is a reliable workhorse.
Tapered and Conical Drills
Tapered drills are shaped to match the profile of many modern tapered implants. In softer bones, they work partly by compressing the tissue as they advance, rather than removing it entirely. This helps improve primary stability in areas where bone density is lower, such as the posterior maxilla.
Cortical Release Drills
The hard outer layer of the jaw resists insertion force. Without proper preparation of this layer, placing the implant can stress the crestal bone and compress surrounding tissue. Cortical release drills reduce that entry resistance without disrupting the cancellous bone beneath, allowing for smoother, more controlled implant insertion.
Scallop and Bullet Shaped Drills
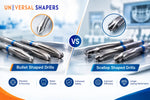
These instruments go further than creating a standard cylindrical osteotomy. Scallop-shaped drills create a biological architecture around the implant platform to support soft tissue integration, while bullet-shaped drills contour bone incrementally to improve how the implant and abutment sit against surrounding tissue. Both designs contribute to better biological and aesthetic outcomes, particularly in visible areas of the arch.
The Role of Drill Geometry in Clinical Performance
Two drills can look nearly identical yet behave very differently at the operatory. Tip angle, flute depth, and cutting-edge sharpness all affect how the instrument interacts with bone at each stage of the preparation.
An efficient flute design clears bone chips from the cutting path continuously. Shallow or poorly designed flutes pack debris into the osteotomy, increasing resistance and raising local temperature. The tactile feedback a surgeon receives, and how much control they maintain, is partly a function of these geometric details.
Why Material Quality Affects Every Case
A drill made from high-grade surgical steel holds its cutting edge through more uses than one made from inferior material. A sharper drill cuts with less friction, and less friction means less heat. Bone is sensitive to temperature above a certain threshold, and cells damaged during drilling are cells that cannot support osseointegration.
Choosing instruments with consistent material quality protects the biology of the site from the first case of the day through to the last.
Matching Your Drill to the Bone
Bone quality varies from patient to patient and site to site. Dense bone, common in the anterior mandible, requires drills that cut efficiently while keeping heat low. Copious irrigation and a full drilling sequence are essential here.
Softer bone, more typical in the posterior maxilla, calls for a different approach. Using a slightly undersized final drill, or choosing instruments that compress rather than purely remove bone, can make a real difference to primary stability. Matching the drill to the actual bone, rather than a generalized assumption, improves outcomes across a wide range of patients.
Compatibility with Your System and Surgical Guide
Every implant system has its own specifications. Drills not precisely calibrated to those specifications introduce variability at each step, and small inconsistencies can accumulate across a full procedure in ways that affect implant positioning and prosthetic fit.
In guided surgery, this compatibility becomes even more critical. The drill must fit accurately within the surgical guide sleeve, and its dimensions must match the implant being placed. Instruments that do not align with the guide system undermine the very precision that digital planning is designed to deliver.
What to Look for When Evaluating a Drill Kit
The best implant drills are not necessarily the most expensive ones. They are the ones that perform consistently, maintain their edge through appropriate use, and fit the systems a clinician already works with.
A reliable kit moves logically from pilot drilling to final site preparation, with each instrument clearly marked and matched to the protocol steps. Universal Shapers offers precision-engineered surgical drills, including scallop, bullet, and cortical release instruments, designed to work as a complete system rather than a set of mismatched tools. The range covers guided and freehand approaches across multiple implant diameters.
Signs That Drill Performance May Be Falling Short
A few practical signals suggest a drill is not performing as it should. Excessive resistance in bone of normal density often points to a dull cutting edge or debris building up in the flutes. More heat than expected at the site, despite adequate irrigation, is another sign worth taking seriously.
After placement, if primary stability is lower than the bone type should allow, the osteotomy preparation itself is worth reconsidering. Poor stability at the moment of placement is one of the earliest signs that something in the drilling sequence did not go as planned.
Final Thoughts
Choosing the best implant drills for your practice is a clinical decision, not a supply-chain one. The instruments used to prepare a site shape every outcome that follows, from osseointegration to soft tissue response to how the restoration holds up years later.
Taking time to evaluate drill types, match instruments to bone quality, and invest in a well-organized kit pays off with every procedure. Better tools do not replace clinical expertise. They give that expertise a more reliable foundation to work from.