How Can Dentists Reduce Heat Generation During Dental Implant Drilling?
Bone tolerates very little overheating. A rise of about ten degrees above body temperature, held for a minute, can harm the surrounding bone.
Friction is unavoidable when a drill cuts bone. Some heat is unavoidable too. The goal is to keep it below the level that damages living cells.
This guide explains why heat builds up and lists practical steps to control it. It also covers what to look for when you compare drills. We write as a maker of surgical drills for implant site preparation.
Key Takeaways
-
Bone damage becomes likely when temperature stays above 47°C for about one minute.
-
Drill wear, speed, pressure, depth, bone density, and irrigation all affect heat.
-
Sharp drills, continuous irrigation, and short drilling passes lower the risk.
-
Guided surgery and dense bone need extra attention to cooling.
-
No drill replaces good technique, so check both your tools and your protocol.
Why Heat Matters During Osteotomy Preparation
Researchers widely cite 47°C held for one minute as the point where bone begins to suffer thermal damage. This damage, called thermal osteonecrosis, can lead to delayed healing and failed osseointegration. Some reports place the damage point even lower, near 44°C.
Friction is unavoidable during bone drilling for dental implants. The real question is how much heat reaches the bone, and for how long. Every step below targets those two factors: temperature and time.
What Causes Heat During Implant Site Preparation
Several factors work together to raise bone temperature. Reviews of the research point to these main contributors:
-
Drill sharpness and wear
-
Drill diameter, design, and material
-
Drilling speed and the pressure you apply
-
Drilling depth and total drilling time
-
Irrigation type and coolant temperature
-
Bone density
No single factor acts alone. A sharp drill used with poor irrigation can still overheat the site. One study found the smallest drill diameter produced the highest temperature rise, so pilot drills deserve attention.
Practical Ways to Reduce Heat
You cannot remove heat from bone drilling for dental implants entirely. These habits keep it in check.
Start with sharp, undamaged drills
Worn cutting edges rub instead of cut, and that friction raises temperature quickly. Wear builds with repeated use and sterilisation cycles. One 2024 in-vitro study suggested replacing pilot drills after 15 cycles. Always follow the manufacturer's reuse guidance, and retire any drill with dull or deformed edges.
Irrigate continuously and generously
Coolant carries heat away from the drill and the bone. Keep irrigation running throughout the cut. One literature review favoured combined irrigation and sharp drills. In one laboratory study, chilled saline produced the lowest bone temperatures.
Drill in short, intermittent passes
Lift the drill out regularly. This lets coolant reach the site and clears bone debris. One laboratory protocol used five seconds of drilling followed by three seconds of withdrawal, with continuous irrigation.
Control speed and pressure
Speed and pressure both influence temperature, and studies disagree on the ideal mix. One in-vitro study recorded its lowest temperatures at higher speed and pressure with chilled saline. Follow the maker's speed guidance, and keep your force steady rather than hesitant.
Work in stages
Enlarge the osteotomy gradually, from a pilot drill to the final diameter. Large jumps in size make the drill remove more bone per pass. Some authors suggest fewer drilling steps in guided cases, since every pass adds heat. Either way, each step must cut cleanly.
Take extra care in guided surgery and dense bone
Studies report higher temperatures with guided surgery than with the conventional approach. Sleeves can limit how well coolant reaches the drill tip. Dense cortical bone also calls for caution. In these cases, shorten each pass and confirm that irrigation reaches the site.
What to Look For When Comparing Drills
Drill choice affects heat alongside technique. Clinicians who search for the best implant drills often focus on price or kit size. Heat behaviour deserves a place on the checklist too.
-
Sharp, consistent cutting edges from the first use
-
Clear guidance on reuse and replacement
-
Diameters and lengths that match your implant system and planned depth
-
A design that clears bone debris
-
Compatibility with your handpiece or guided sleeve
Ask for evidence of how a drill behaves during bone drilling for dental implants, such as wear guidance. Inspect implant osteotomy drills from any maker on arrival, and check them against your planned diameter and depth.
How Universal Shapers Fits Into Your Protocol
At Universal Shapers, we make drills for implant site preparation. Our patented technology profiles, sculpts, and scallops bone with precision. Our range supports bone drilling for dental implants through shaping, profiling, and stepwise preparation.
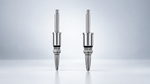
Our bullet shaped drills are designed to shape an implant osteotomy. They also create a scallop-shaped bedding for the future restoration. Our Guided Surgical Kit includes a pilot drill and multiple burs for stepwise preparation. It works with a handpiece or a guided sleeve.
No drill removes the need for sound technique. Irrigation, sharpness, and pressure control still decide how much heat reaches the bone. If you have questions about drill sizes or sequences, please contact our team through the website.
Conclusion
Heat control comes down to a few habits. Use sharp drills, irrigate continuously, drill in short passes, and keep your pressure steady. Take extra care with guided cases and dense bone.
These small habits protect the bone and the long-term outcome of every implant.